MITRE Attack is the most popularly used when it comes to attack structure and framework, this is also used by microsoft widely across its products. Lockhead Martin has its own attack framework but it is not as widely used as MITRE but still effective when it comes to the frameworks.
MITRE ATTACK is a corner stone in security implementations and its products within Microsoft and Azure, which includes Defender and Sentinel.
The other corner in the implementing security is the concept of Defense in Deapth. The following image gives us a basic idea on how DiD works and what it is.
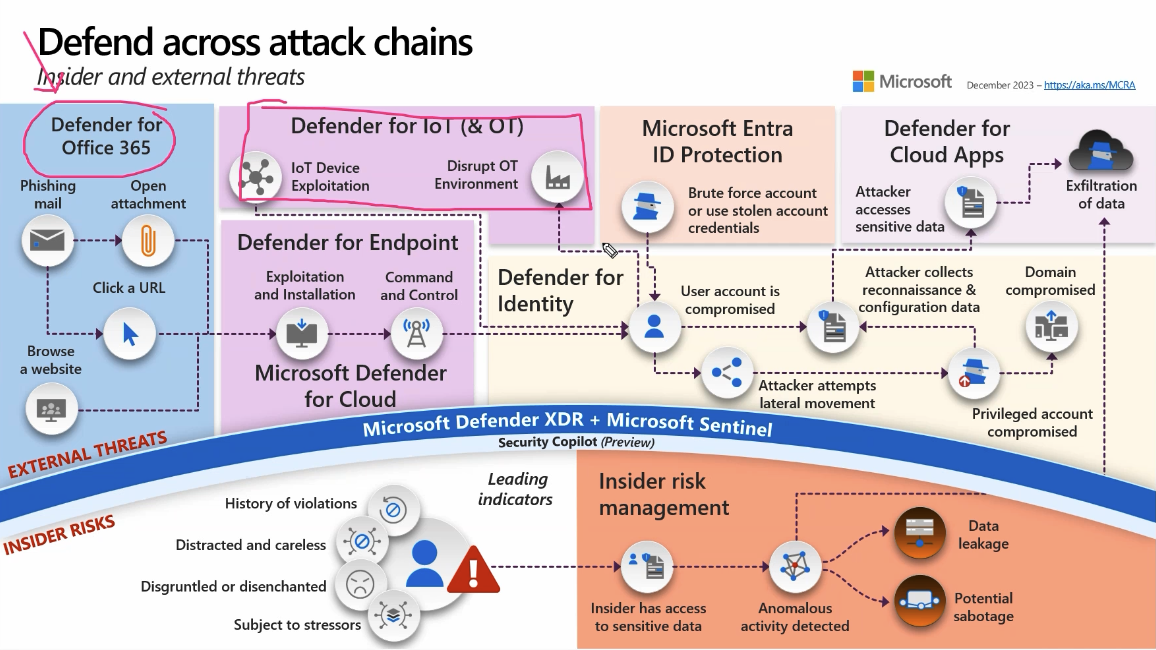
Now, we have all these different products or solutions we are implementing such as Defender for endpoint, Defender for cloud, Entra ID Protection. But All these solution have their specific tasks and activity they look into. Individually looking, the activities might not look like they are dangereous. But looking wholistically, they might indicate some kind of attack or threat.
This is where Defender XDR comes into play. Defender for XDR connects the dots and try to paint a whole picture of the activities. When it comes to Sentinel, it a central place for Logging and Analysis from all the production or solutions that we have implemented.
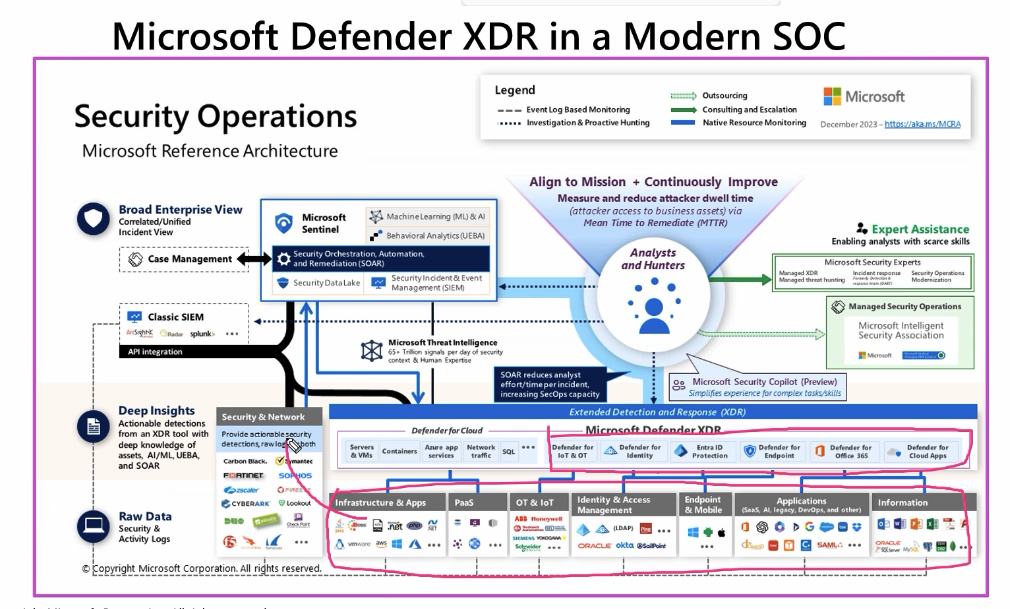
As depected in the picture, we can see that all the different different solutions like IaC Apps, PaaS, IAM, Application etc are proctected by differnet solutions but all these solutions are connected to Defender XDR to connect all the dots from different solutions providing us a wholistic view of the activity.
On top of this XDR, we have our Classic SIEM or Sentinel where all the logs are aggregated to help us analysis and hunt any threats we might this are bad activity.
There are multiple tier on how threat hunting works. THe below picture helps us understand how different tier of investigations are done, with escalation if needed.
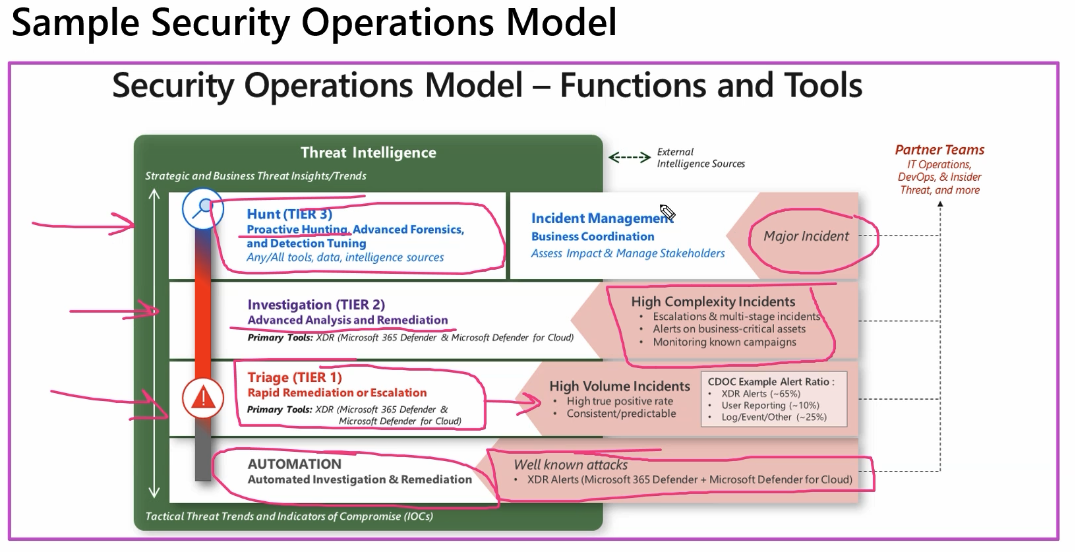
First, we can have our automation to investigate and remediate any common threats or frequent threat that we have,
TIER 1 is basically a fist step in an incident triage process and we escalate if we suspect any malicious activity then we have TIER 2 where an advanced analysis and Remediation is done. These are essentially escalations and business critical alerts along with multi stage incidentss
Finally we have TIER 3 which is essentially a zero day kind situation with all hands on deck with advanced forensics, proactive hunting, and tuning. This also includes keeps stake holders in the loop and post incident analysis on imapact and remediation of such alert going forward.
Within Microsoft Defender, Microsft give us our security score, which gives us an idea of what our security posture of out oraganization is along with all teh recommandations on how to increase our security score to get our bank for the buck. If we are paying for Defender, we obviously want to get our money’s worth. Recommandation to increase our security score is one of those ways to get our money’s worth.
100 % security score is rare in production as most organizations have multiple exceptions and reasons for not enabling some security recommandations. These recommandations will also have how much they impact our score along with the resources that are non compliant to this recommadations. It will also provide us with steps to implement these recommandations.
Security score is updated at every night according to GMT timezone.
An incident in Defender XDR is a collection of correlated alerts and associated data that make up a story of an attack, as mentioned above. The below image depects how the incidents in XDR are generated, by collecting all the data from different sources to provide a clear picture.

Defender Agent will not let any malware get installed on our machines, for a honeypot, we have to disbale the agent, then install the malware and enable the agent to get the data. Once the agent is turned on, it will show the entire timeline of the activity and which resources are affected. It will also try to remediate the alert.
But, How did the agent know? So, the agent will collect evidence before starting any remediation or reporting incident. it will provide an attack story on how it started and how the attack progressed with time.
For a server, Defender will also enable us to isolate the device. This isolation will reached out to agent installed in the server to change the NIC rules by blocking all the outgoing traffic.
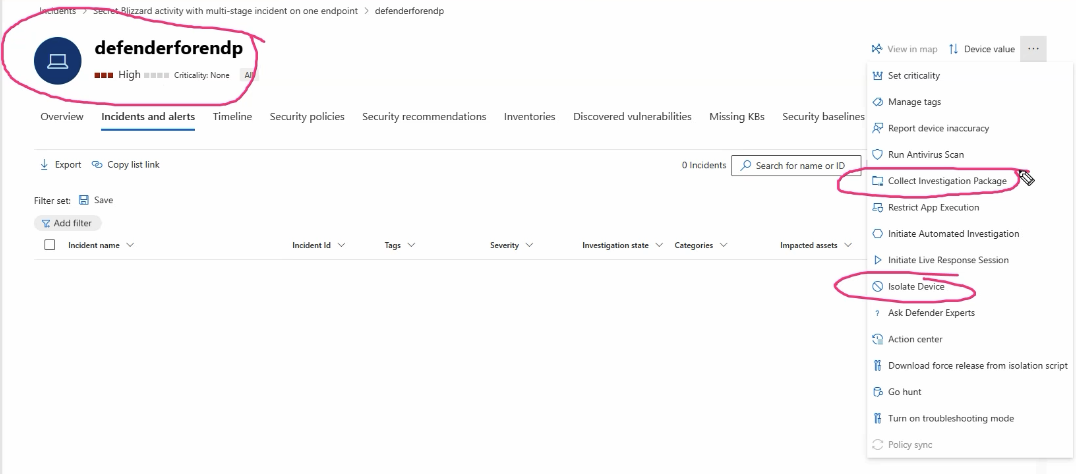
We can also collect all the investigation packages, which is essentially a data collection which includes all the dagta related to the server, helping us to investigate the server to filter out the root cause. Look at the above image to get a clear understanding on all the different options we have with in defender to help us investigate or remediate the incident.
Now, all this data is collected just by installing the agent, no additional configuration or anything. All we have to do is to install the agent to enable us with all these different options.
As mentioned, The agent will work automatically to stop or remediate any known attacks. In recent time, Defender have adopted AI and ML, to stop or remediate any suspected attacks.
We can also, launch an investigation into a server which provides us with all activies that have occured in action center. it will provide all the investigations that we have launched within the server. This is very useful for copilot to investigate.
We can also configure the XDR to send email notifications regarding alerts within the XDR to notify us when an incident is created and when the incident’s state is changed
For configuring all the Office 365 security trainings, we can leverage this to protect our office 365. This can also simulate some attack vector to train the personal. We can create campagain to simulate live attack trainings like sending an intentional link to all the users.
We can also set policy and rules to manage devices on which the outlook is installed along with the preset security configurations that a device should have before install the office on their respective devices.
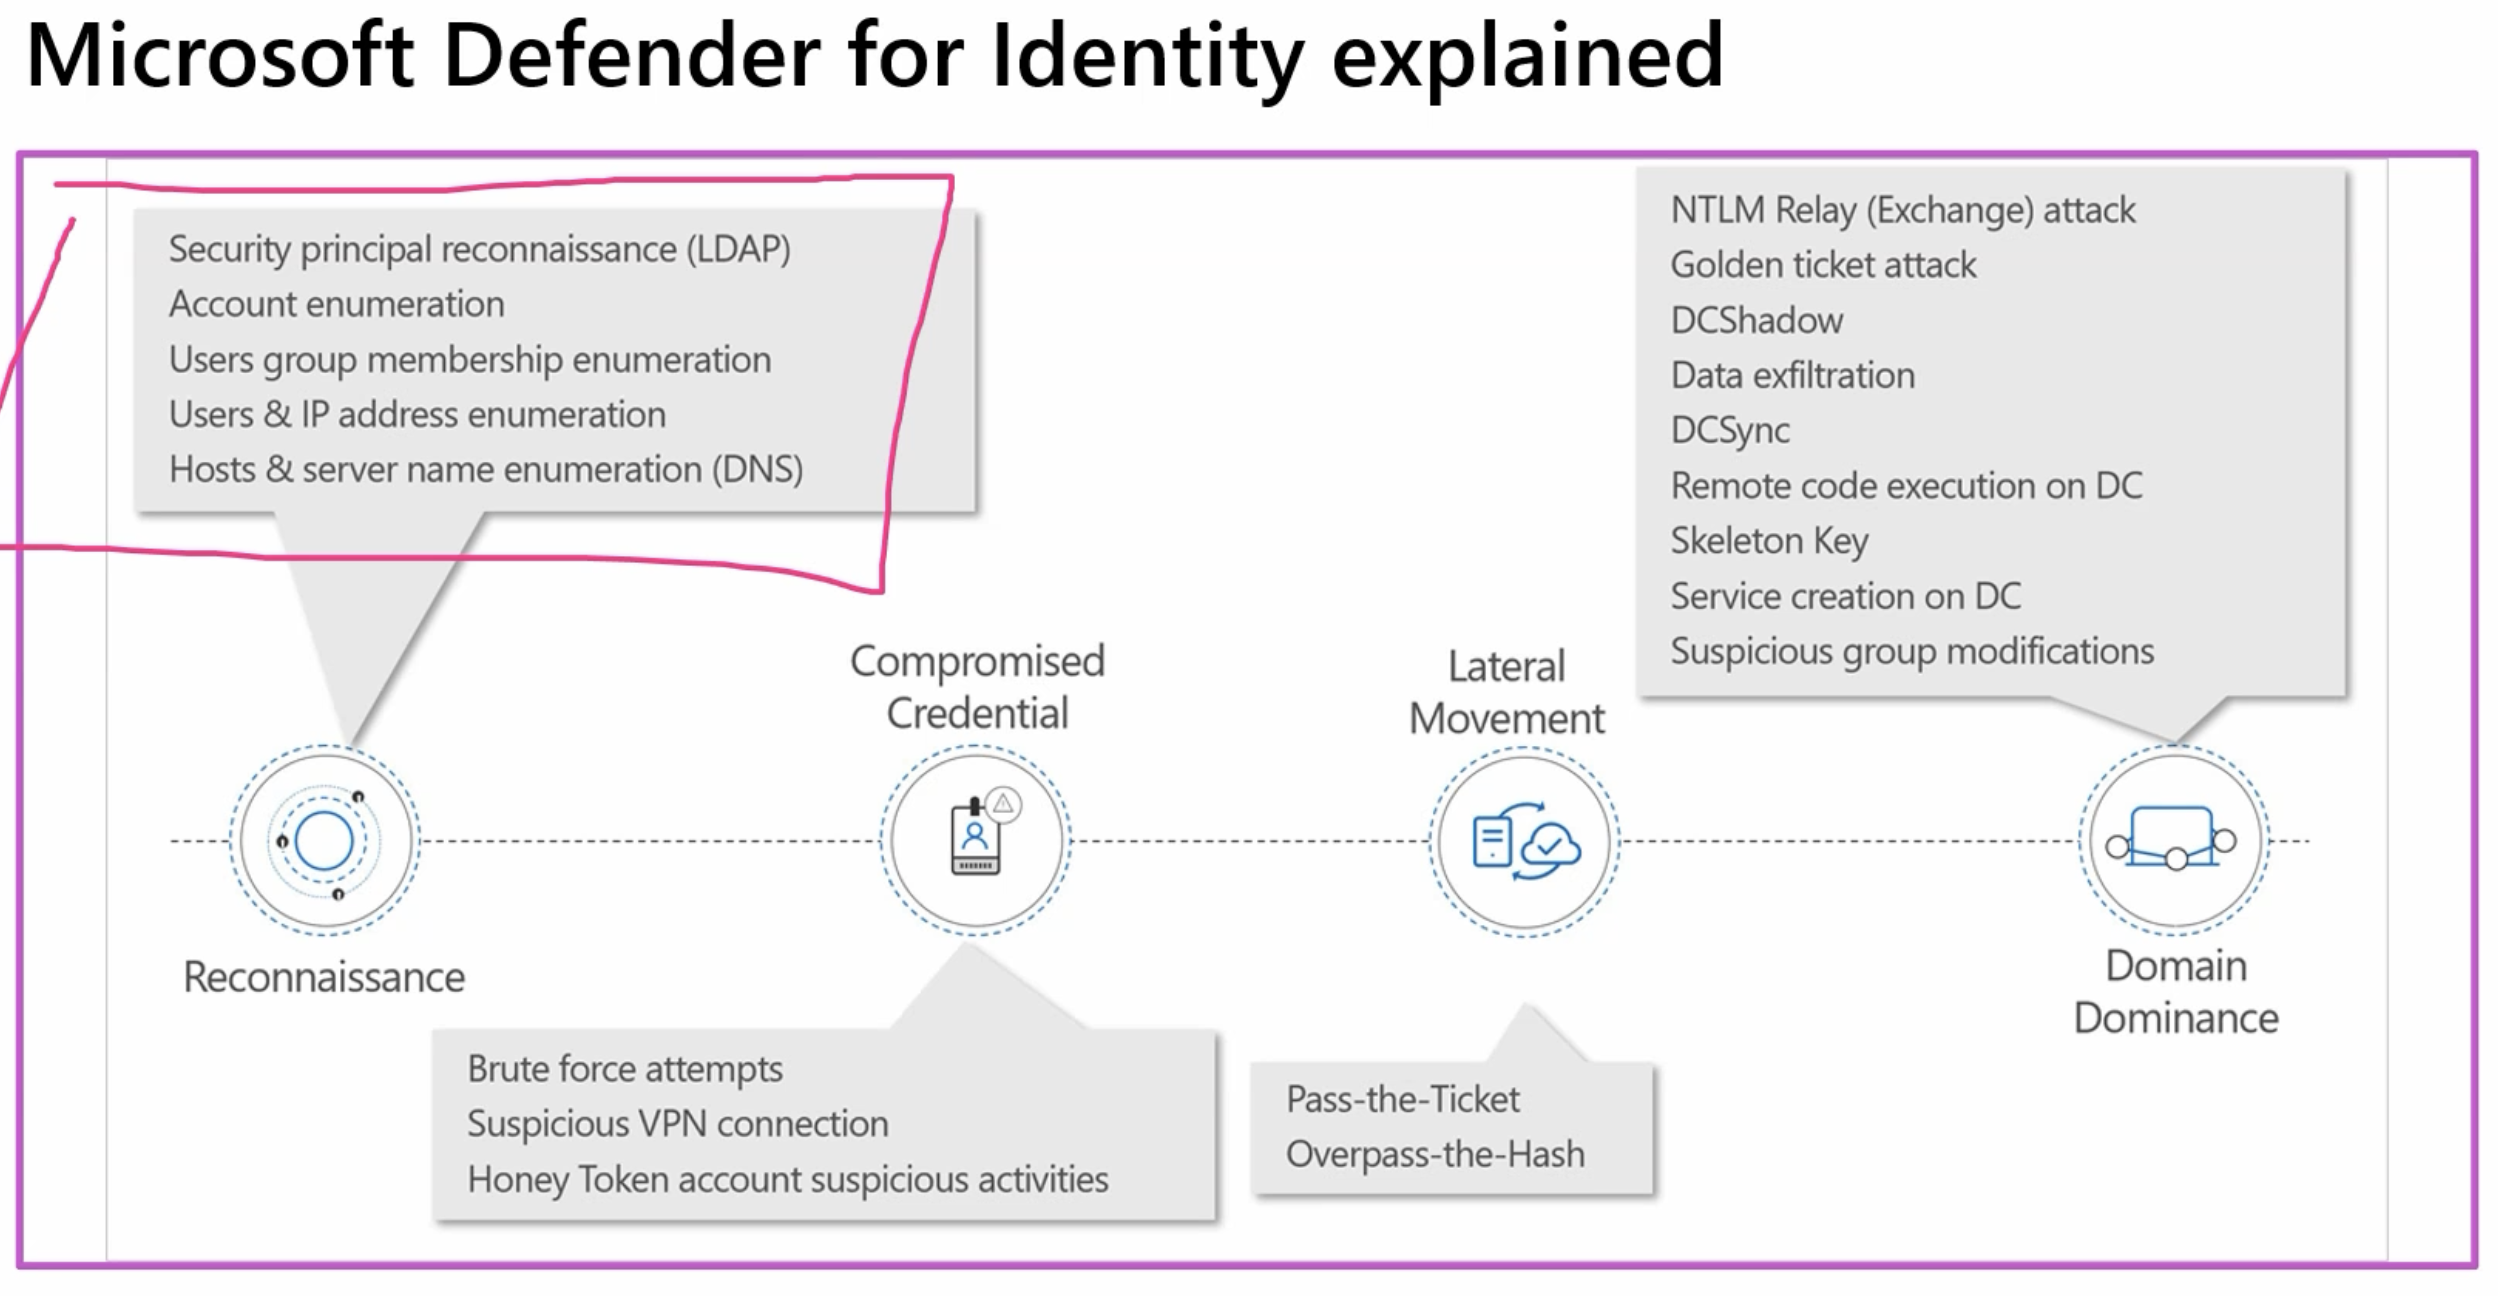
Defender for Identity usually comes out of the box with entra directly if we have proper licensing plan. The following image shows us some of the attack vectors that this Defender for Identity
Defender for Identity adopts to the user activity. The Defender for Identity looks at the last 2 weeks of login activity, to analyze and create incidents. We can also configure the defender to block any malicious activities during the logon. But the defender will not block if there is just a one risk than usual. It required more than one risk to essentially block the user, only if its configured.
The below link will give us a specific idea on what the defender will look for as a risk.
Defender for Identity will also give us an idea on how a lateral movement looks like along with potential assets that can be risked if a resource is compromised, how many other resource can be effected with lateral movement.
The following are few Microsoft purview solution that we can leverage. There are other solutions that we can also using uisng Data loss Preventions. Purvire relates to all the Outlook or device management.
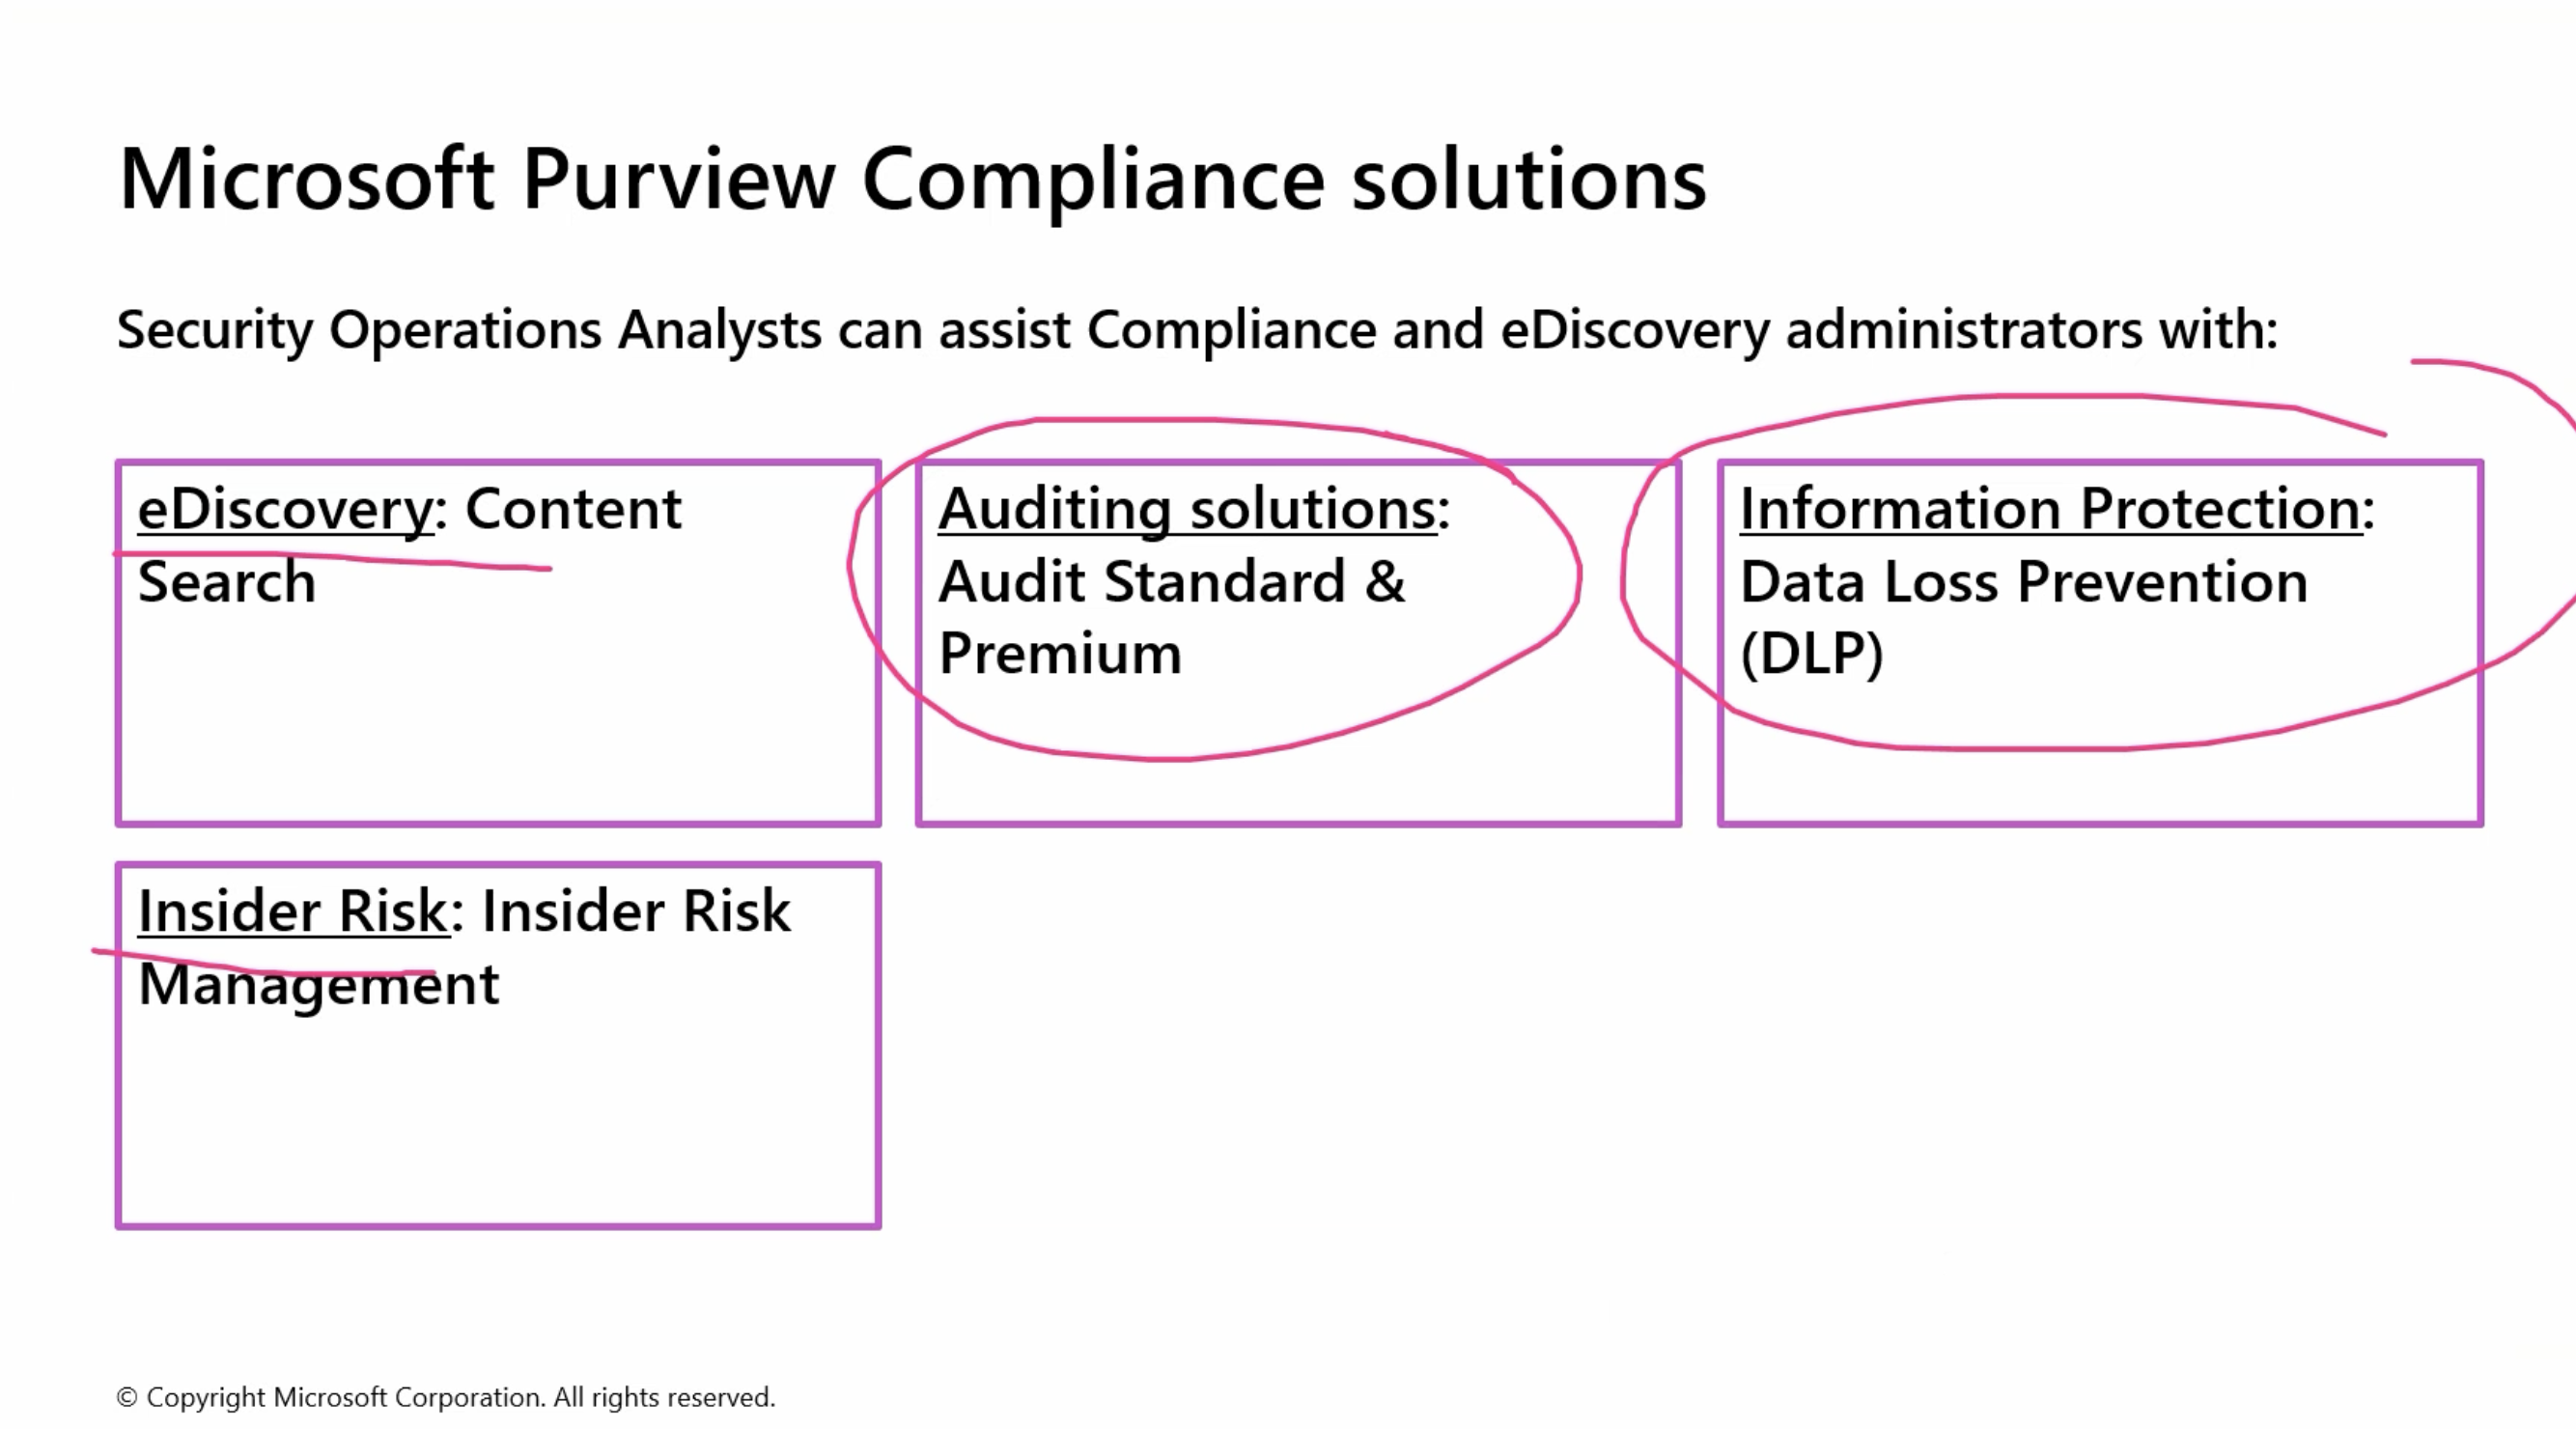
We can also leverage purview for auditing and compliance as well.
Defender for endpoint is an agent based endpoint protection similar to symantic or any other endpoint protection services. The agent can be pushed to mobiles, tabs or laptops. But we can automate this onboarding process to the servers. The onboarding can be managed in settings
Meeting notes: Meeting Overview: Bobbie provided an overview of the meeting, including a summary of the previous day’s discussion and the plan for the current session. They mentioned that the session would cover three modules: Defender for Endpoint, Defender for Cloud, and Kusto Query Language (KQL). Previous Day’s Summary: Bobbie provided a summary of the previous day’s discussion, which included topics such as the Microsoft Defender Portal, Defender for Cloud Apps, Defender for Identity, Defender for Office, and a demonstration of Purview. Current Session Plan: Bobbie outlined the plan for the current session, which would cover three modules: Defender for Endpoint, Defender for Cloud, and Kusto Query Language (KQL). They emphasized the goal of getting through all three modules, with flexibility based on the class’s progress and feedback. Defender for Endpoint: Bobbie discussed the Defender for Endpoint service, explaining its purpose as an anti-malware solution similar to McAfee or Norton. They mentioned that it requires an agent to be installed on devices and provided details on how to deploy the agent on various devices. Service Purpose: Defender for Endpoint is described as an anti-malware solution similar to McAfee or Norton, designed to protect devices from malware and other threats. Agent Installation: Bobbie explained that Defender for Endpoint requires an agent to be installed on devices. This agent is essential for the service to function and provide protection. Deployment Methods: Details were provided on various methods to deploy the agent, including manual installation, group policies, and using tools like Intune or System Center. Protection Scope: Bobbie highlighted that Defender for Endpoint protects a wide range of devices, including workstations, servers, laptops, desktops, mobile phones, and tablets. Agent Deployment: Bobbie explained the process of deploying the Defender for Endpoint agent, including manual installation, group policies, and using tools like Intune or System Center. They also mentioned the importance of ensuring the agent is installed on all devices to provide protection. Manual Installation: Bobbie described the manual installation process, which involves downloading the installation package, running it as an administrator, and following the prompts to complete the installation. Group Policies: Group policies can be used to deploy the Defender for Endpoint agent across multiple devices, automating the installation process and ensuring consistency. Intune and System Center: Bobbie mentioned that tools like Intune and System Center can be used to deploy the agent, providing centralized management and deployment capabilities. Importance of Deployment: Emphasis was placed on the importance of ensuring the agent is installed on all devices to provide comprehensive protection against threats. Log Analytics Workspace: Bobbie discussed the importance of the Log Analytics Workspace, which is created during the initial deployment of Defender for Endpoint. They explained that the workspace stores data gathered from the Defender products and is essential for reporting and queries. Workspace Creation: The Log Analytics Workspace is created during the initial deployment of Defender for Endpoint, and it is essential for storing data gathered from the Defender products. Data Storage: The workspace stores data such as logs, alerts, and incidents, which are used for reporting and queries to analyze the security posture of the environment. Reporting and Queries: Bobbie explained that the data stored in the Log Analytics Workspace is crucial for generating reports and running queries to monitor and manage the security of the environment. Geographical Location: During the initial deployment, the geographical location of the workspace must be specified, and this location cannot be changed later. This decision is important for compliance and data residency requirements. Remediation Levels: Bobbie explained the different remediation levels available in Defender for Endpoint, which determine how the system responds to detected threats. They provided details on the various levels, from no response to fully automated remediation. Remediation Levels: Bobbie described the different remediation levels, including no response, semi-automated requiring approval, and fully automated remediation. Each level determines how the system responds to detected threats. No Response: In the no response level, the system detects threats but does not take any action to remediate them. This level requires manual intervention to address the threats. Semi-Automated: Semi-automated remediation requires approval for certain actions. For example, the system may automatically remediate threats in temporary folders but require approval for actions in core folders. Fully Automated: Fully automated remediation allows the system to automatically remediate all detected threats without requiring any approval. This level provides the highest level of automation and protection. Attack Surface Reduction: Bobbie introduced the concept of Attack Surface Reduction (ASR) and explained how it can be configured using Intune. They provided examples of ASR rules and discussed the importance of reducing the attack surface to prevent threats from running on devices. ASR Concept: Attack Surface Reduction (ASR) aims to minimize the attack surface of devices by implementing rules that prevent threats from running. This reduces the likelihood of successful attacks. Configuration Using Intune: Bobbie explained that ASR can be configured using Intune, a cloud-based management tool. Intune allows administrators to set and enforce ASR rules across devices. ASR Rules: Examples of ASR rules include blocking executable content from email and webmail clients, blocking untrusted and unsigned processes from USB drives, and blocking potentially obfuscated scripts. Importance of ASR: Bobbie emphasized the importance of reducing the attack surface to prevent threats from running on devices. Implementing ASR rules helps to enhance the overall security posture of the environment. Defender for Cloud: Bobbie introduced Defender for Cloud, explaining its purpose in protecting infrastructure, servers, databases, networks, and web applications. They discussed the difference between the free and upgraded versions, with the latter providing proactive and reactive protection. Service Purpose: Defender for Cloud is designed to protect infrastructure, including servers, databases, networks, and web applications. It provides comprehensive security for cloud environments. Free vs. Upgraded Versions: Bobbie explained the difference between the free and upgraded versions of Defender for Cloud. The free version offers best practice recommendations, while the upgraded version provides proactive and reactive protection, including vulnerability assessments and threat detection. Proactive and Reactive Protection: The upgraded version of Defender for Cloud includes features such as proactive threat detection, automated response to incidents, and continuous vulnerability assessments to ensure the security of the cloud environment. Multi-Cloud Support: Defender for Cloud supports not only Azure but also other cloud environments like AWS and Google Cloud. This allows organizations to manage and secure their multi-cloud infrastructure from a single platform. Regulatory Compliance: Bobbie discussed the regulatory compliance feature in Defender for Cloud, which allows organizations to ensure they meet various industry standards. They explained how to enable and manage compliance standards, such as PCI DSS and GDPR. Feature Overview: The regulatory compliance feature in Defender for Cloud helps organizations ensure they meet various industry standards, such as PCI DSS and GDPR. It provides tools to monitor and manage compliance. Enabling Compliance Standards: Bobbie explained how to enable compliance standards in Defender for Cloud. Organizations can select the relevant standards and enable them to start monitoring compliance. Managing Compliance: Once compliance standards are enabled, Defender for Cloud continuously monitors the environment and provides recommendations to address any compliance gaps. This helps organizations maintain compliance with industry standards. Custom Compliance Standards: In addition to predefined standards, organizations can create custom compliance standards to meet specific regulatory or organizational requirements. This flexibility allows for tailored compliance management. Just-in-Time VM Access: Bobbie explained the Just-in-Time VM Access feature, which allows administrators to dynamically open and close ports for remote access to virtual machines. They provided an example of how this feature can enhance security by limiting the exposure of RDP and SSH ports. Azure Arc: Bobbie discussed Azure Arc, a tool that allows organizations to manage non-Azure servers by installing an agent. They explained how to add servers to Azure Arc and the benefits of using this tool for managing and protecting servers in various environments. Workbooks: Bobbie introduced the concept of workbooks, which are customizable dashboards used to visualize data and monitor security. They explained how to create and edit workbooks in Defender for Cloud and other Azure services. Follow-up tasks: Lab Environment Issues: Investigate and resolve the scripting issues preventing the deployment of the lab environment. (the team) Lab Access: Email the lab access code to participants as soon as the lab environment issues are resolved. (Bobbie) KQL Reference Material: Review the KQL tutorial and SQL to KQL reference material provided in the chat. (Participants) KQL Session: Prepare for the KQL session scheduled for tomorrow by reviewing the provided reference materials. (Participants)