
End to End DevOps E-Commerece project.
This document going to outline one of the open source demo application and use that application to implement all the devops solutions and best practices. The demo application we are going to look at is the OpenTelemetry’s E-Commerce application.
The following is the architecture of the application by openTelemetry,
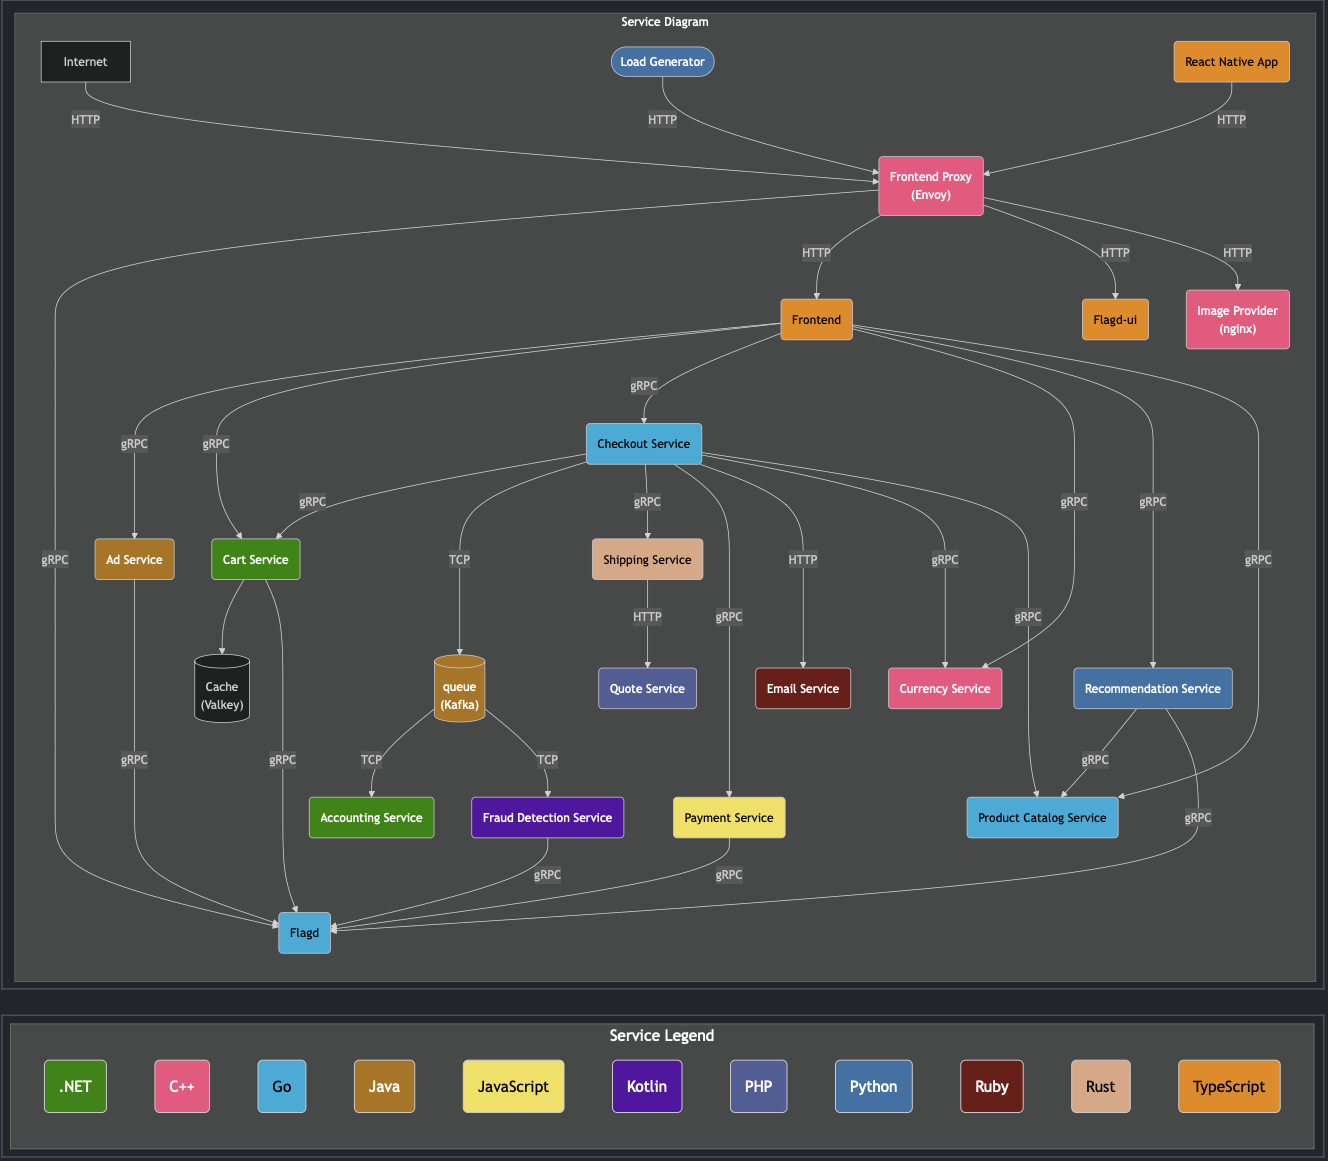
There are different microservices that are used in this project and each of the service is written in a different programming language, which helps us when we try to containerize the application. Go, .NET, Java, Javascript, PHP, Ruby, TypeScript etc are few of the programming languages that are utilized for developing the microservices of this demo application.
For more information of this demo application, visit Architecture Application.
Technologies used
The following are the technologies that are used in this current project. (This is a fluid list that will keep changing as the project goes) 1. AWS 2. Docker 3. Terraform 4. Kubernetes
Setting up the environment
To start with, I am using an EC2 to execute all the code within our cloud environment. Considering the specs of this application, t2.large is the size of the machines that I have landed upon for seamless execution of project. Once the instance is up and running, make sure to have proper inbound and outbound rules to interact with the instance from local machines.
Docker Installation
Now, Moving on to install docker. The following is the script that is used to install docker (from the docker install official page)
1
2
3
4
5
6
7
8
9
10
11
12
13
14
15
16
# Add Docker's official GPG key:
sudo apt-get update
sudo apt-get install ca-certificates curl
sudo install -m 0755 -d /etc/apt/keyrings
sudo curl -fsSL https://download.docker.com/linux/ubuntu/gpg -o /etc/apt/keyrings/docker.asc
sudo chmod a+r /etc/apt/keyrings/docker.asc

# Add the repository to Apt sources:
echo \
  "deb [arch=$(dpkg --print-architecture) signed-by=/etc/apt/keyrings/docker.asc] https://download.docker.com/linux/ubuntu \
  $(. /etc/os-release && echo "${UBUNTU_CODENAME:-$VERSION_CODENAME}") stable" | \
  sudo tee /etc/apt/sources.list.d/docker.list > /dev/null
sudo apt-get update

# install docker engine within my environment
sudo apt-get install docker-ce docker-ce-cli containerd.io docker-buildx-plugin docker-compose-plugin
to verify the installation of docker, run
1
docker --version
or
1
docker ps
Note: when running docker ps for the first time, I got permissions denied as I was not using elevated permissions to run the commands. To fix this, I have added ethe user to docker group, so I can run docker commands without using sudo everytime I run docker cli
1
sudo usermod -aG docker ubuntu
Once the command is executed, either logout and log back in to the instance to restart the service or directly restart service to apply the changes made.
Kubectl installation
Now that we have docker installed, we are moving to install kubectl from kubernetes offical documentation. I have used curl to install this.
1
2
3
4
5
## Download binaries required
 curl -LO "https://dl.k8s.io/release/$(curl -L -s https://dl.k8s.io/release/stable.txt)/bin/linux/amd64/kubectl"

## install downloaded packages
sudo install -o root -g root -m 0755 kubectl /usr/local/bin/kubectl
We can also verify the downloaded version using checksum of the binaries using the below command
1
2
3
4
curl -LO "https://dl.k8s.io/release/$(curl -L -s https://dl.k8s.io/release/stable.txt)/bin/linux/amd64/kubectl.sha256"

## Validate the check sum of binaries
echo "$(cat kubectl.sha256)  kubectl" | sha256sum --check
Terraform installation
The last thing that I have installed is Terraform. Similar to kubectl, I had to download the packages first that are required for terraform after verifying the fingerprint of the download, i installed terraform using apt package manager. All are teh steps that are outlined within the official hashicorp documentation
I had to download the packages before installing terraform because, by default, hashicorp packages are not available within our ubuntu images. To verify the installation
1
2
3
4
5
## verify the version of terraform install
terraform --verision

## verify terraform commands working as expected
terraform --help
Dry Run
Before moving on to the actual project, I always do a dry to understand what the project is and what I am dealing with. Doing a dry run, will give us an idea of how the project works and the workflow of the application. Inorder to containerize and deploy in kubernetes, it is always a best practice to do a dry run. This is especially useful in large projects that have multiple microserverices with different languages like the demo application we are working with.
I have a docker compose file that created all the containers for the services and starts those said containers. Looking at the services it spinned up,
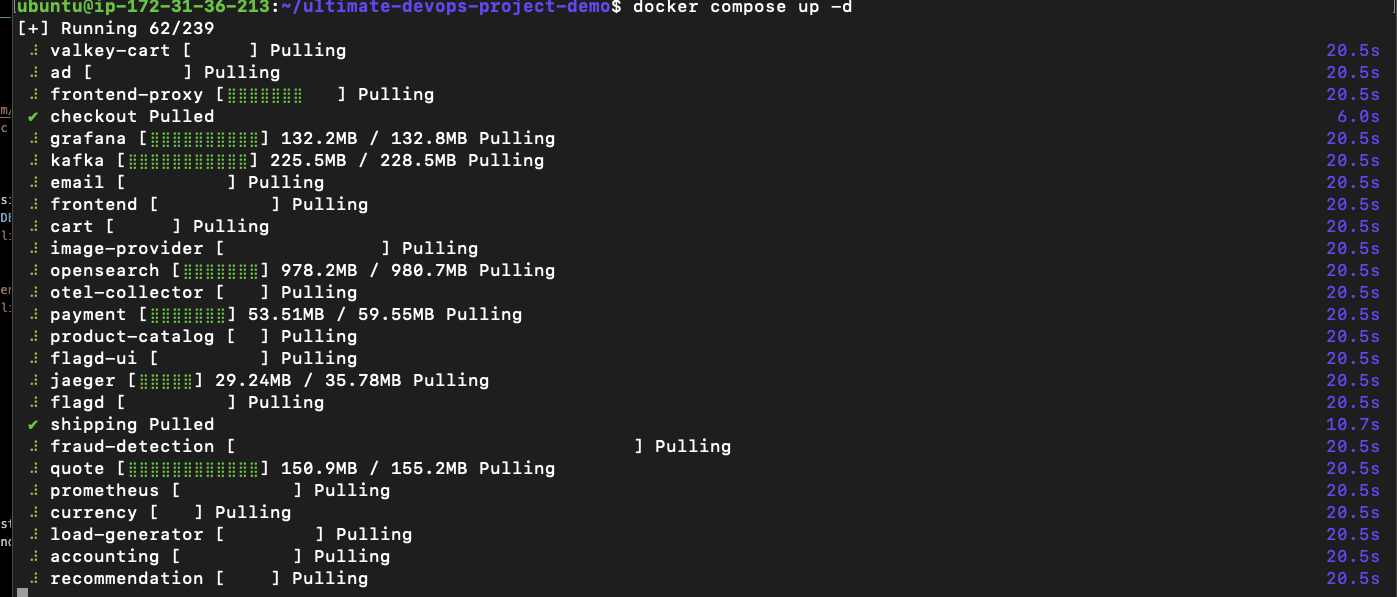
From the above image, docker is trying to spin up cart, frontend, shipping, prometheus and grafana, fraud detection, email, kafka and other services that are necessary for this application to run.
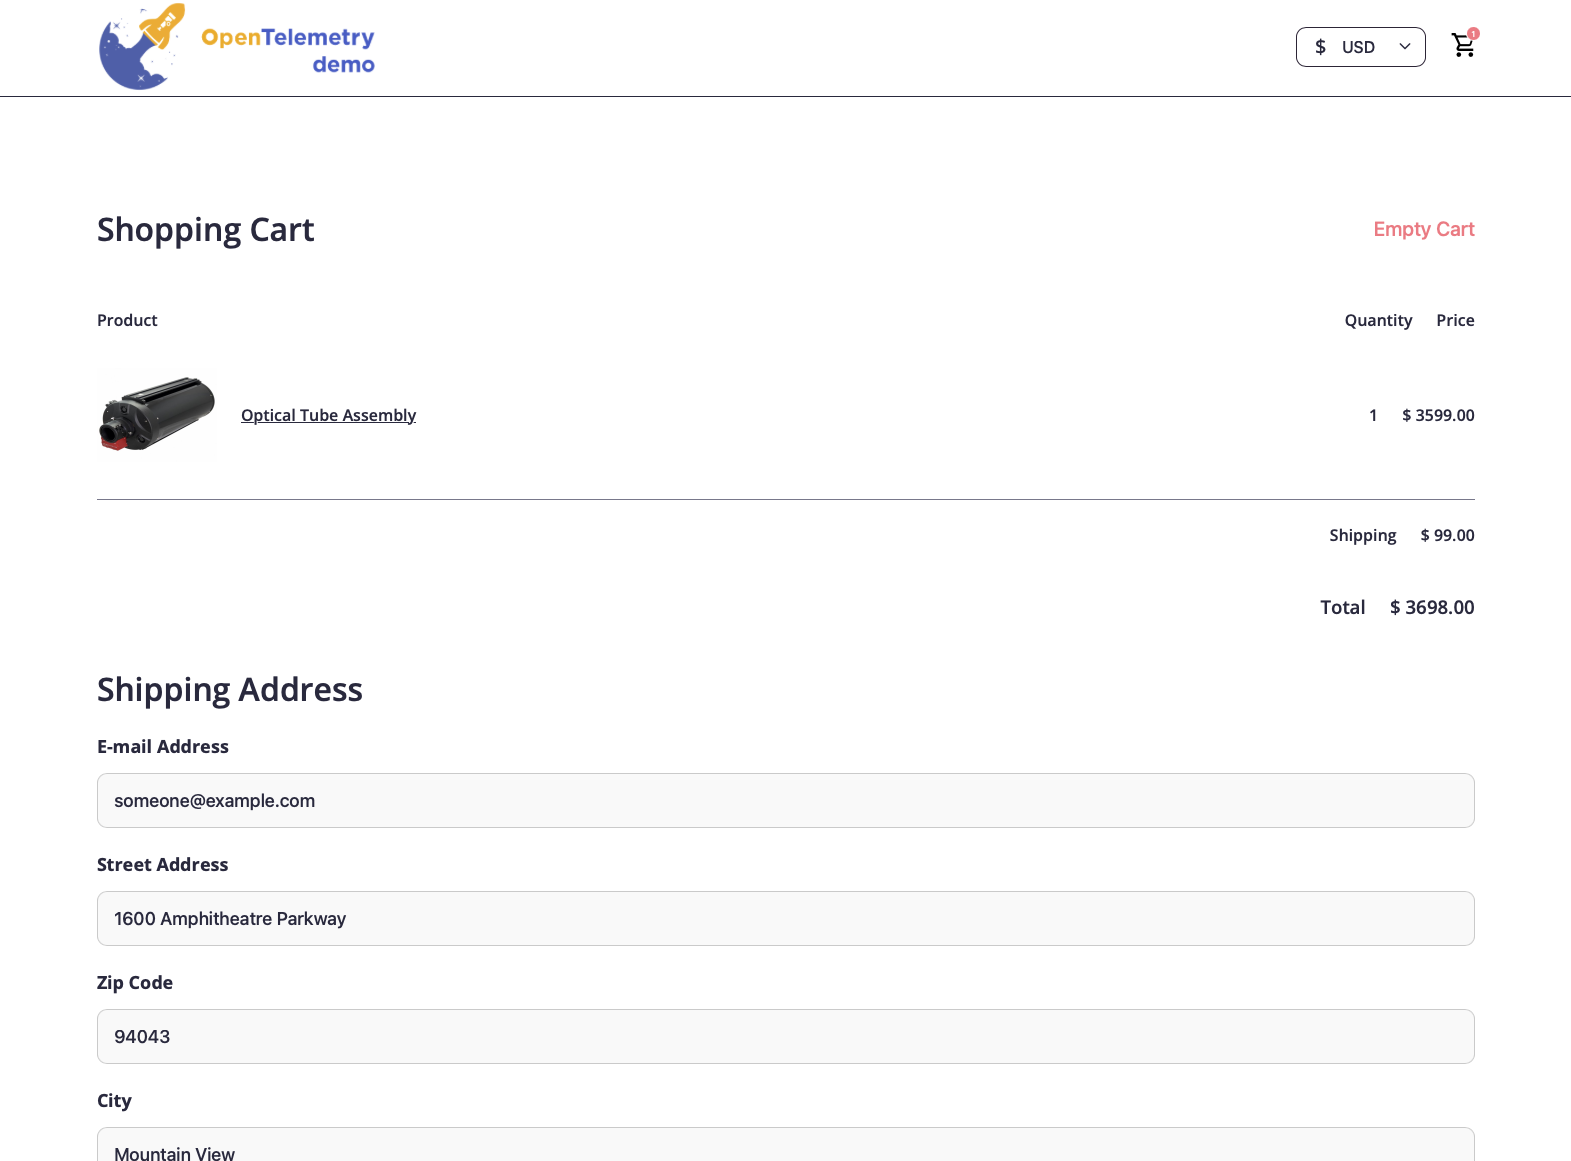
Now, that I have all the required services up and running, I need to access my project hosted on my EC2 instance. By default, all traffic is denied unless specified, like it would in a firewall. So, I have to add a new security rule ato access the project.
I have added a new inbound rule within my instance’s security group to allow custom TCP traffic originating only from my IP. Now, I was able to access the site on the EC2 instance’s public IP, on the port 8080. Below is the screenshot of the application that was created based on my dry run.
Containerization of the application
In my experiance, the basic docker life cycle would be:
- Create a Dockerfile
- Build Image
- Spin up a container using the above image
The current demo application has about 21 microservices. I will be containerizing the following microservices
- Product catalog services : Go
- Frontend : Java
- Recommendation : Python
The main reason why I chose these microservices is because of my familiarity with Go and Python. To showcase my abilities in containerizing services written in multiple languages.
Go Microservice
Now, Before creating the dockerfile for containerizing the application, I followed the documentation to see if the microservice is working fine by deploying this manually. This is a similar process to what I had done with the actual project.
I have verified that the steps included in the read me file works, so I moved on to start the docker life cycle by creating a dockerfile.
Since this is go based, I only downloaded go.mod file on to the docker image to get all the dependencies. When it comes to dockerfile creation, I created a multi stage docker build with golang as base image. The main reason I chose to use multi stage docker file is firstly to decrease the size of my end docker image by using a distroless image. As a distroless linux image has very less binaries, this is a more secure image compared to the other based images, that have application binaries along with other dependencies.
Java Microservice
Similar to what I did with go microservice, I have first did a manually in my local, then I have started creating dockerfile for this service.
This java microserver is based on graddle. Now, when I build this project uisng graddle, it will start the gradle deamon, will install the dependencies, complies the code and builds the application which is stored in a destination specified. When I am able to build and run the service locally, I followed the same practices from go service for building this dockerfile
Python Microservice
For this service, I did not get any instructions from the repository on how to build or start the service. So, I want through the code to get some idea on how the service was built and how can I execute it. Mostly for python, execution of python microservices are fairly straight forward.
But to start with, I created a simple dockerfile based on my understanding. Now, when I ran the docker image that was created, I did not get any errors. Hence, I have containerized the microservice even without any instructions on how to execute the service locally.
For all three serivces, once I have my dockerfile, I built the docker image using the following command. Based on the life cycle, after the image is built, we can do docker run <image_name> to test the proper running of the image.
1
docker build -t <docker_hub_repo_name/folder_name>:<verison> .
I have used version inorder to keep track of the changes made and to compare how it does with the previous verison.
Now that I have all the images created and tested, I have pushed these image to my docker hub repo. (Usually for pipeline development, I use gitlab with registry to store my docker images, but for this cae, I am using my dockerhub)
To push images to a container registry, there are many registries available like ECR, GCR, ACR, quay.io and the default docker.io. To login, I can either login first and push the image or I can directly login and push the image using a single command
1
2
3
4
5
6
7
8
## To use default docker login.
docker login docker.io

## To authenticate with quay registry
docker login quay.io

## To authenticate with ECR
docker login <ecr_arn>
To push the image to a container, once I logged in.
1
2
3
4
docker push lohit01/product-catalogue:v2

# # Both commands have the same functionality
# docker push docker.io/lohit01/product-catalogue:v2
Due to using multistage dockerfile and distroless image, the docker image sizes are very minimal, which helps with faster run time and upload time to the container.
NOTE: Docker init
Doecker Init basically writes the docker files that are requried for the microservices but only if I have docker desktop installed. Docker init cannot be used to within my EC2 instance or anywhere that doesn’t have a docker desktop
When using Docker init, it will ask for some questions like a language the service is written in, port it needs to listen on, version of the base image etc. Once we answer all the question, It will create a Dockerimage, with all the best practices like multistage, that we can use directly without having to write the dockerfile manually.
Troubleshooting
The following are the main issues that I ran into so far and how I addressed them:
Ran into an disk space issue failed to register layer: write /usr/share/opensearch/jdk/lib/modules: no space left on device as my ec2 only has 8 GB space left. To troubleshoot this,
1
2
3
4
5
6
7
8
9
10
## Get the disk partitions of the instance, to figure out which partition is causing the error.
ubuntu@iip.address:~/ultimate-devops-project-demo$ df -h
Filesystem      Size  Used Avail Use% Mounted on
/dev/root       6.8G  5.4G  1.4G  80% /
tmpfs           3.9G     0  3.9G   0% /dev/shm
tmpfs           1.6G  916K  1.6G   1% /run
tmpfs           5.0M     0  5.0M   0% /run/lock
/dev/xvda16     881M   76M  744M  10% /boot
/dev/xvda15     105M  6.1M   99M   6% /boot/efi
tmpfs           794M   12K  794M   1% /run/user/1000
To modify the volume space, I navigated to my volume that is attached to my ec2 and select modify. This will allow me to modify the space on my instance without any hassle, as shown in the screenshot below.
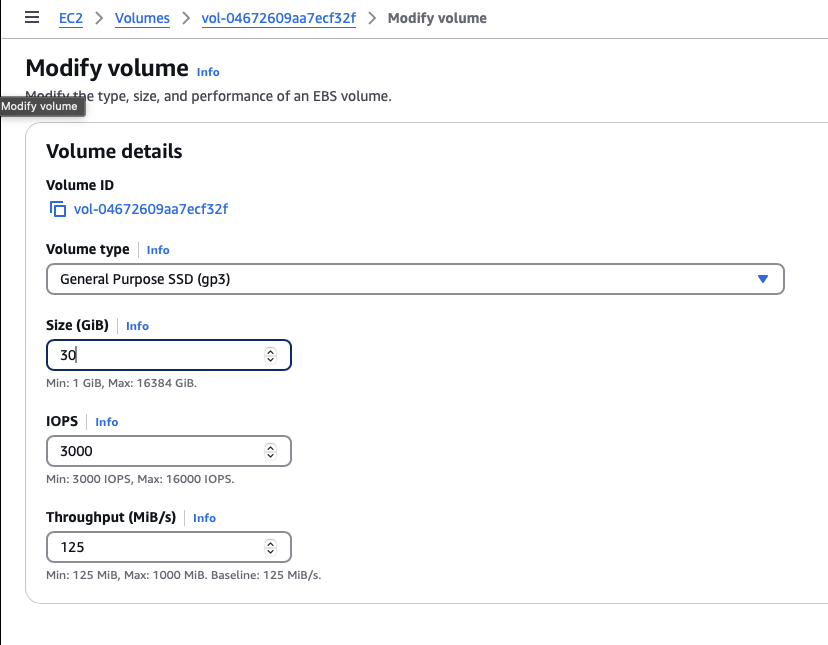
Now, the change I made is not instant. Since the instance is still running when I made the change, it took AWS sometime to actually make the change to the instance. I monitored the change on the volume state section, as demonstrated below.

Now that I haverified that my change are in effect, I have to add the additionally allocated changes to in my instance. When we look at all the storage blocks within our instance using lsblk. I noticed that the changes made were reflected within the xvda(which is the storage block for xen based virtualization, which is what AWS uses to spin instances up) but it was not designated to the \ root partition that we are utilizing.
1
2
3
4
5
6
7
8
9
10
ubuntu@ip.address:~/ultimate-devops-project-demo$ lsblk
NAME     MAJ:MIN RM  SIZE RO TYPE MOUNTPOINTS
loop0      7:0    0 26.3M  1 loop /snap/amazon-ssm-agent/9881
loop1      7:1    0 73.9M  1 loop /snap/core22/1722
loop2      7:2    0 44.4M  1 loop /snap/snapd/23545
xvda     202:0    0   30G  0 disk
├─xvda1  202:1    0    7G  0 part /
├─xvda14 202:14   0    4M  0 part
├─xvda15 202:15   0  106M  0 part /boot/efi
└─xvda16 259:0    0  913M  0 part /boot
To fix this issue, I had to grow the partition 1, which is the root partition for my instance, and then resize the partition to to update it with the extra space. This is similar to what I did with proxmox resizing. The following are the commands used for achieving this.
to install the required packages
1
sudo apt install cloud-guest-utils
To grow the partition 1 under /dev/xvda which is the root filesystem partition used by the instance
1
sudo growpart /dev/xvda 1
To resize the partion to filesystem for the instance to use.
1
sudo resize2fs /dev/xvda1
Docker Compose
So, I have containerized 3 of the microservices, but I have 10 to 15 services that I have to containerized and when I deploy this application, I will have to run all these Dockerfiles individually on top of creating a docker network for the containers to talk to each other, creating required volumes, pulling all 15-20 images individually and run all these individually, which is not actually feasible, especically if the application has more microservices like the one I am working with.
to overcome these issues, I have decided to use docker compose. To create all the docker components that are required for all containerized serivces to run on top of using a single command to spin up all 20-25 containers, I used docker-compose, which is a yml file that contains all the steps required for the application to run. Docker compose contains three important parent objects, services, networks and volumes. The file consists of how to pull images to run all the services along with steps to create requried networks and volumes for these services to run.
The basic structure of docker compose file is fairly similar to pipelines that I usually created in gitlab for automating.
Docker vs Container Orchestration (kubernetes)
In general, containers are ephimeral instances which means that a container can go down for any number of issues and when the container comes up again (using restart available within docker) the IP of the container changes casuing the all its connections to fails. This is Service Discovery. This is the main problem that kubernetes set out to solve on top of disaster recovery and other services that docker doesn’t offer. Hence the need for container orchestration was needed, which was the basis for developing kubernetes.
Docker compose vs Kubernetes manifest
Docker compose is a single command to spin up all required containers with a single command but it is essentially a more streamlined way of executing and deploying docker containers. But kubernetes manifests try to achive load balancing, high availability, clustering and service discovery to orchestrate the containters within our environment.
NOTE:
This is the initial part of project which has been divided into multiple parts based on functionality.